Showing posts with label Computer. Show all posts

Ashampoo Snap 7.0.4 + Crack (Final Version)

0
Monday, September 01, 2014


မိမိကြန္ျပဴမွာလုပ္ေဆာင္သမွ်ေတြကို screenshots လုပ္ခ်င္သူေတြအတြက္ images and videos က
အစရုပ္သံၾကည္လင္စြာေဆာင္ရြက္ေပးႏိုင္တဲ့ Ashampoo Snap 7 ကိုလူတိုင္းသိၾကပါတယ္။အားလံုး
အဆင္ေျပေစရန္အတြက္ေဒါင္းေလာ့စ္ဖိုင္ထဲမွာ Crack ဖိုင္ေလးပါထည့္သြင္းေပးထားပါတယ္။အျမဲတန္း
Full Version အျဖစ္အသံုးျပဳႏိုင္ပါျပီ။၀င္းဒိုး (32bit/64bit) အားလံုးအသံုးျပဳႏိုင္ပါတယ္။


Ashampoo Snap 7 is the smartest way to capture screenshots, add notes and annotations and share them with your friends. With Ashampoo Snap 7 you capture images and videos right from your screen in seconds, capture rectangular regions, use free form capture for maximum flexibility, use timers for interval capturing.

New in Ashampoo Snap 7

Smoother workflow
Ashampoo Snap 7 uses optimized drawing routines to provide a smoother, rounder look and feel that you will simply love.

Less complexity
With Ashampoo Snap 7, it takes less clicks to achieve your goals. Save time and boost your productivity.

Smarter work environment
Ashampoo Snap 7 employs smart background versioning so your original image is never lost and all modifications remain editable. Want to start over? Revert to the original at the click of a button.
 Sharing has never been easier
You no longer require an installed application to email your work, thanks to the integrated support for browser-based email clients. The integration with common file hosting services has also been greatly improved with integrated support for Dropbox, Google Drive and Microsoft Sky Drive. Need an even easier way to share your work? Upload it to Ashampoo Webspace, now with HTML 5 video support, and share a unique Internet link with your friends. Furthermore, Ashampoo Snap 7 features JXR and PSD export with layers for easy processing, e.g. with Adobe Photoshop, for power users.

Operating System: Windows® XP, Windows Vista® (32bit/64bit), Windows® 7 (32bit/64bit), Windows® 8 (32bit/64bit)


home Page - www.ashampoo.com


http://bc.vc/wUUvxJ 
(or)

http://adfoc.us/14251337811845 
(or)

http://adfoc.us/14251337811838 
★★နည္းပညာၿမိဳ႕ေတာ္★★
 
Continue reading →

Torrent ကုိ ဘယ္လုိအသုံးခ်မလဲ

0
Friday, August 15, 2014


Torrent ကုိ ဘယ္လုိအသုံးခ်မလဲ  
အမ်ားစုက torrent ကုိမသုံးတတ္ၾကပါဘူး..။download ဆြဲဖုိ႔ဆုိရင္ IDM ရွိရင္ လုံေလာက္ျပီ ထင္တတ္ၾကတယ္..။ ဒါေပမဲ့ တခါတရံမွာ Windows OS ေတြ photoshop ေတြ Latest ျဖစ္တဲ့ software
ေတြ HD movie ေတြကုိ download လုပ္ခ်င္တဲ့ အခါမ်ိဳးမွာ torrent က အျခား downloader ေတြထက္ ပုိျပီးအားသာခ်က္ေတြ ပုိမ်ားပါတယ္..။
ဒါဆုိရင္ torrent ကုိ ဘယ္လုိသုံးမလဲ???
အရင္ဆုံး uTorrnet last version ေလးကုိ  ဒီမွာ ယူျပီး ပုံမွန္အျခား software ေတြကုိ install လုပ္သလုိပဲ စက္ထဲကုိ ထည့္လုိက္ပါ..။ျပီးရင္....
google မွာ torrent search လုိ႔ ရုိက္ျပီး torrent search engine ကုိသြားလုိက္ပါ..။
အဲဒီကုိေရာက္ရင္ က်ေနာ္ျမွားနဲ႔ ျပထားေနရာမွာ ကုိယ္လုိခ်င္တာကုိ ရုိက္ထည့္ပါ..။
(ဥပမာ) ျပထားတဲ့ အတုိင္းပါပဲ man လုိ႔ရုိက္ထည့္လုိက္ရင္ သူ႔အမည္ရွိရာေတြ က်လာပါလိမ့္မယ္..။
အဲဒီမွာ win လုိ႔ရုိက္လုိက္တာနဲ႔  သူနဲ႔ ပါတ္သတ္တာေတြက်လာပါမယ္..။ အဲဒီမွာ က်ေနာ္က windows 8  ကုိေရြးလုိက္ပါတယ္..။
က်လာတဲ့ windows 8 နဲ႔ ပါတ္သတ္တာေတြအထဲက က်ေနာ္ေရြးထားတဲ့ဟာကုိ ျမွားနဲ႔ ျပထားပါတယ္..။
အဲဒီမွာလည္း က်ေနာ္ေရြးတာကုိ ျမွားျပထားပါတယ္..။
ဒီေနရာမွာ Download Torrent ကုိေရြးလုိက္ပါတယ္..။
 
open with မွာ utorrent (default) ကုိေရြးျပီး ok ကုိ ႏွိပ္လုိက္ပါ..။
အဲဒီလုိက်လာရင္ ကုိယ္မလုိခ်င္တာကုိ အမွန္ျခစ္ျဖဳတ္ထားလုိက္ျပီး ok ..
အဲဒီမွာ ေတြ႔ရတဲ့ အတုိင္း Torrent က သူဘာသာ သူ download လုပ္ေနတာေတြ႔ရပါမယ္..။
သူ႕ program ကုိ ပိတ္ထားရင္ေတာင္ ေနာက္ကြယ္ကေန ဆက္ျပီး download လုပ္ေနပါလိမ့္မယ္..။
သူ႔ေဒါင္းလုိ႔ မျပီးခင္ ကြန္ပ်ဴတာ ပိတ္ျပီး ေနာက္ရက္မွ ဆက္ေဒါင္းလည္း ရပါတယ္..။
ဒီေလာက္ဆုိရင္ Torrent ကုိ အသုံးခ်တတ္မယ္ထင္ပါတယ္..။music ေတြ movie ေတြကုိလည္း
torrent search engine ကေနတဆင့္ ရွာေဖြ ေဒါင္းယူနုိင္ပါတယ္..။
 
Credit >>> Ko Chan Nyein

Zuu
Continue reading →

ကြန္ပ်ဴတာအတြက္ေဇာ္ဂ်ီေဖာင္႔ 32-bit & 64-bit

0
Wednesday, August 13, 2014


ကြန္ပ်ဴတာအတြက္ေဇာ္ဂ်ီေဖာင္႔လုိအပ္ေနသူမ်ားေအာက္ကလင္႔မွာယူႏုိင္ပါၿပီ 32-bit အတြက္ေရာ 64-bit အတြက္ပါတင္ေပးလိုက္ပါတယ္။
 
ေဇာ္ဂ်ီေဖာင္႔ 32-bit  


ေဇာ္ဂ်ီေဖာင္႔ 64-bit 


အဆင္ေျပပါေစ
 
 
Credit >> ဇူးနစ္
Continue reading →

computer ရိွသူတိုင္းေဆာင္ထားသင္ ့တဲ ့advance system care pro 7.0.3

0
Monday, August 11, 2014


computer ရိွသူတိုင္းေဆာင္ထားသင္ ့တဲ ့advance system care pro
========================================
ကြန္ပ်ဴတာရဲ ့လုပ္ေဆာင္မွဴ ့ကိုအျမဲအျပံဳးေလးေတြနဲ ့ျပေပးမဲ ့advaned system care pro 
Windows 2000/XP/Vista/7/8 ေတြမွာအသံုးျပဳလို ့ရျပီး full version 
ရမယ္ဗ်ာ။အသံုးျပဳရတာလည္းလြယ္တယ္ ကၽြန္ေတာ္ဆိုသေဘာက်လို ့ အျမဲသံုးေနက်ပါ တစ္ခုက 
မိမိကြန္ပ်ဴတာအတြက္သန္ ရွင္းေရးလုပ္ေပးဖို ့ျဖစ္ျပီး uninstall လုပ္မရ တဲ ့software ေတြကိုရွင္းလင္းေပး
 ပါတယ္။အိပ္ခါနီးက်ေလာက္မွာ စက္ကို auto repair  & shut down မွာ 
အမွန္ေလးျခစ္ေပးထားရံုနဲ ့အလိုအေလ်ာက္အလုပ္လုပ္ေပးနုိင္တာမို ့။စက္ရွင္းဖို ့ပ်င္းတဲ ့မိတ္ေဆြေတြအတြက္လည္း
သင္ ့ေတာ္မွာပါ။သူ ့ကိုအသံုးျပဳမယ္ဆိုရင္ နွစ္ခုလံုးကို download ယူရမွာျဖစ္ပါတယ္။series key 
ကိုထည္ ့မယ္ဆိုရင္ အင္တာနက္ကိုပိတ္ျပီးမွထည္ ့ပါ။
ဒါကေတာ ့ series key ေလးပါ။ 


Advanced System Care PRO 7.3 License Key: 9EA02-A59E7-447AC-4CEB4


စိုင္းသူ
Continue reading →

PGWARE SuperRam 6.1.20.2014 Free Download

0
Tuesday, July 01, 2014


ကြန္ပ်ဴတာ ေႏွးေကြးေလးလံလာတယ့္ အခါမွာ ကြန္ပ်ဳတာရဲ့ RAM ကို စြမ္းေဆာင္ရည္ ျမွင့္တင့္ေပးမယ့္
PGWARE SuperRam 6.1.20.2014 ေနာက္ဆံုးထြက္ version ေလးပါ


အသံုးျပဳပံု ကေတာ့လြယ္ပါတယ္ ကြန္ပ်ဴတာေလးလာတယ့္ အခါမွာ ဒီ software ေလးကို Run ေပးလိုက္ရုံပါဘဲ full version အျဖစ္သံုးနိဳင္ေအာင္ crack ဖိုင္ပါထည့္ေပးထားပါတယ္။
software သြင္းပံု သြင္းနည္းကေတာ့  Download PGWARE SuperRam ကို ေဒါင္းလိုက္ပါ ျပီးရင္ ကြန္ပ်ဴတာမွာ internet connection ကို ပိတ္ထားပါ ေဒါင္းလို့ ရလာတယ့္ rar file ကုိျဖည္လိုက္ပါ ဖိုင္နွစ္ခုကို ေတြ့လိမ့္မယ္ အဲဒီထဲက super ram.exe ကို ကြန္ပ်ဴတာ မွာ သြင္းလိုက္ပါ သတိျပဳရမွာက software ကို သြင္းျပီးသြားပါက လံုးဝ လံုးဝ မ run ပါနဲ့အံုးး
က်န္ရွိတယ့္ patch ဖိုင္ကို mouse Right click copy နွိပ္ပါ ျပီးရင္ C:\program files\PGWARE\super ram ထဲမွာ paste နွိပ္လိုက္ပါ ဒါဆိုရင္ Full version အျဖစ္သံုးနိဳင္ပါျပီ
ၤfile size 6.9 MB
Download Mediafire


Credit >>>> PyinChit Blog Continue reading →

oCam Screen Recorder 22.0.0

0
Thursday, June 05, 2014


ဒီေကာင္ေလးကေတာ့မိမိကြန္ျပဴရဲ႕လုပ္ေဆာင္မႈ Computer screen, video recording ေတြကအစလြယ္
ကူစြာျပဳလုပ္ႏိုင္သည့္အျပင္ (AVI, MP4, FLV, MOV, TS, VOB) အစရွိသည္ျဖင့္ျပန္ထုတ္ယူႏိုင္ပါတယ္။
Screen capture အျဖစ္လည္း (JPEG, GIF, PNG, BMP) စသည့္ Image Format ေတြထုတ္လို႔ရပါတယ္။
portable ေဆာ့စ္၀ဲေလးျဖစ္တဲ့အတြက္သယ္ေဆာင္ရေပါ့ပါးျပီးအသံုးျပဳရလြယ္ကူပါတယ္။
 Download Here
Link 2 ကတိုက္ရိုက္ လင့္ျဖစ္ပါတယ္ခင္ဗ်ာ
အဆင္ေျပပါေစ
ဇူးနစ္(နည္းပညာ)
Continue reading →

ကိုယ္တိုင္လက္ေတြ႔ Network ခ်ိတ္နည္း

0
Tuesday, May 13, 2014


အေျခခံ Network ခ်ိတ္နည္းေလးပါ။
ဒီနည္းလမ္းေလး သိရံုေလာက္နဲ႔ ကိုယ္တိုင္ ခ်ိတ္ဆက္လို႔ ရပါၿပီ။ အရင္ဆံုး Network
မခ်ိတ္ဆက္ခင္ ႀကိဳးကိုက္တာ သိဖို႔ လိုပါတယ္ ႏွစ္မ်ိဳးရွိပါတယ္ ကြန္ပ်ဴတာ 2 လံုးပဲ ခ်ိတ္
မွာလား အမ်ားႀကီး ခ်ိတ္မွာလား ဆိုတာေတာ့ ေရြးခ်ယ္ပီး ႀကိဳးကိုက္ပါ။

ႀကိဳးကိုက္နည္း ဆိုတာထက္ ႀကိဳးအေရာင္ အလိုက္ေခါင္းမွာ တပ္ဆင္ရမဲ့ကိစၥပါ လုပ္စ
ရွိတဲ့သူ ဆိုရင္ေတာ့ တစ္ခါထဲ အဆင္ေျပပါတယ္၊ လံုး၀ကို မလုပ္တတ္တဲ့ သူကိုေတာ့
စာနဲ႔ အေသးစိပ္ ေရးျပ ရတာ ခက္လို႔ ႀကိဳးနဲ႔ ေခါင္းနဲ႔ ၀ယ္ရင္း အဲဒီ ဆိုင္မွာပဲ လုပ္ခိုင္း
လိုက္ပါ။

ႀကိဳးအဆင္ေျပ မေျပကိုေတာ့ စမ္းသပ္တဲ့ ကိရိယာ ရွိပါတယ္ အဲဒါနဲ႔ စမ္းသပ္ပါ။

ေနာက္ပီး မိမိစက္မွာ Network port မပါရင္ Network card လို ပါမယ္ အားလံုးျပည့္
စံုၿပီဆိုရင္ေအာက္ကပံုကိုၾကည့္ပါ


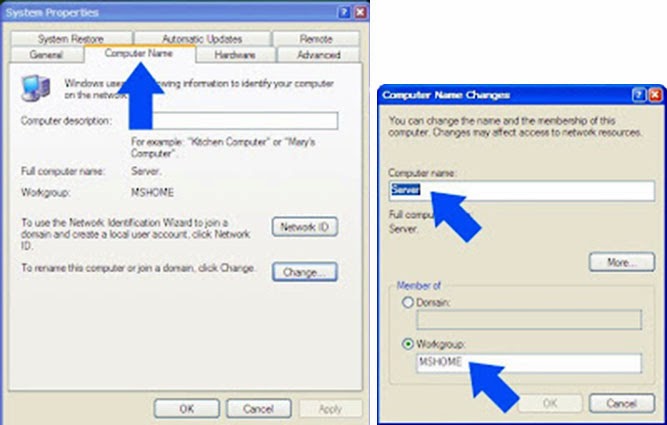
Window key + Pause Break (သို႔) My computer ကို Right-click လုပ္ၿပီး Computer
name tab ကိုႏိုပ္ပါ။ ၿပီးရင္ Change ကိုႏိုပ္ပါ အဲဒီမွာ Computer name က က်န္တဲ့ စက္
ေတြနဲ႔ မတူေအာင္ထားၿပီး Workgroup name ကေတာ့အားလံုးတူရပါမယ္၊

ကိုယ္ခ်ိတ္မဲ့ စက္ေတြ အားလံုး အဲဒါေလးေတြ ျပင္ဆင္လိုက္ပါ ကြန္ပ်ဴတာႏွစ္လံုးထဲခ်ိတ္မယ္
ဆိုရင္ေတာ့ Switch မလိုပါဘူး တစ္လံုးနဲ႔ တစ္လံုးကိုခ်ိတ္ဆက္ဖို႔ ႀကိဳးပဲလိုပါတယ္ 2 လံုးႏွင့္
အထက္ခ်ိတ္မယ္ ဆိုရင္ေတာ့ Switch လိုပါမယ္ အားလံုးပီးျပည့္စံုလို႔ ခ်ိတ္ဆက္ေတာ့ မယ္
ဆိုရင္ ..

1 ကြန္ပ်ဴတာေတြ အားလံုး ႀကိဳးေတြ ထိုးပါ

2 ကြန္ပ်ဴတာမွ နက္၀က္ႀကိဳး အားလံုးႏွင့္ Switch မွာ ခ်ိတ္ဆက္ပါ

3 Run box မွာ ncpa.cpl ရိုက္ထည့္ၿပီး Enter ႏိုပ္ပါ အဲမွာ Local area connection ဆို
တာေတြ႔ပါမယ္ အဲဒါက ကိုယ့္ရဲ႕စက္မွာ Network card တစ္ခု ရွိရင္ တစ္ခုေပၚမယ္ ႏွစ္ခု
ရွိရင္ ႏွစ္ခု ေပၚပါမယ္ သိပ္အေရး မႀကီးပါဘူး ကိုယ္သံုးမယ့္ ကဒ္ကို Right-click ႏိုပ္ၿပီး
Properties ကို ၀င္ပါ ၿပီးရင္ ေအာက္က ပံုကိုၾကည့္ပါ


4 ပီးရင္internet protocol (TCP/IP) ကိုေရြးပါ ေအာက္မွာ properties ကိုႏိုပ္ပါ

5 use the following ip address: ကိုေရြးပီး ip သတ္မွတ္ေပး ရပါမယ္ စက္တစ္လံုးက
192.168.1.1 ဆိုရင္ ေနာက္ စက္ရဲ့ IP မွာ 192.168.1.2 ေပါ့ အဲလိုမ်ိဳး ေနာက္ထပ္ ခ်ိတ္
ဆက္ခ်င္တဲ့ စက္ေတြကိုလည္း ေနာက္ဆံုးဂဏန္းပဲ ေျပာင္းေပး လိုက္ပါ ဒါဆို Network
ခ်ိတ္ဆက္တာ အဆင္ေျပသြားပါၿပီ။

စက္အားလံုး Network မိ မမိ စမ္းၾကည့္မယ္ ping လုပ္ၾကည့္ရေအာင္ ကိုယ့္ရဲ႕ Network
group ထဲမွာ IP 192.168.1.1 ကေန 10 ထိရွိတယ္ဆိုပါစို႔ အရင္ဆံုး Run box မွာcmd
ရိုက္ပီး Enter ႏိုပ္္ပါ Command prompt က်လာရင္ ping 192.168.1.1 ဟုရိုက္ပီး Enter
ႏွိပ္ပါ ေနာက္ၿပီး ping 192.168.1.2/3/4/5/6/7/8/9/10 ဆိုၿပီး စက္တစ္လံုးခ်င္း ping
ၾကည့္ပါ ေအာက္က ပံုကိုၾကည့္ပါ reply လာရင္ ခ်ိတ္မိပါပီ request time out ဆိုရင္ မခ်ိတ္
မိေသးပါ ဒီေလာက္ဆို Network ခ်ိတ္ဆက္တာအဆင္ေျပပါၿပီ။


Credit : http://winhtuttin.blogspot.com

Network ခ်ိတ္နည္း (2)

ကြန္ပ်ဴတာကိုေတြကို 8 port switch နဲ႔ ခ်ိတ္တဲ့ နည္းေျပာျပပါမယ္ ( peer to peer ပါ )

ပထမဆံုး RJ 45 ေခါင္းနဲ႔ male ေခါင္း တြဲပါတဲ့ နက္၀ပ္ cable ေတြနဲ႔ switch မွာ ခ်ိတ္
ဆက္ထားဘို႔ လိုပါတယ္ ပထမဆံုး စက္မွာ IP ထည့္ပါမယ္၊ ခုေျပာျပတဲ့ အတိုင္းထည့္
ၾကည့္ပါ my network place > properties> TCP/IP ကို select လုပ္ properties
ကိုႏွိပ္ပါ..use following IP ဆိုတာမွာ IP address မွာ 15.11.80.1 ၿပီးရင္ tab ခုန္
လိုက္ပါ subnetmark ကိုသူ႔ အတိုင္းရွိပါေစ default gateway မွာလဲ 15.11.80.1
လို႔ရိုက္ထည့္ပါ အားလုံးကို ok လုပ္ၿပီး ထြက္ General Tab ကို ျပန္ေရာက္ရင္ show
icon in notification ဆိုတာကို အမွန္ခ်စ္ လုပ္ေပး ခဲ့ပါ ( tray မွာ ကြန္ပ်ဴတာပံုေလး
ေပၚလာေအာင္ေပါ့) ဒါဆို ပထမ ဆာဗာ အထိုင္စက္ ၿပီးပါၿပီ။

တျခားစက္ေတြ ခ်ိတ္ပါမယ္...။

.my network place > properties> TCP/IP ကို select လုပ္ properties ကိုႏွိပ္ပါ ..
use following IP ဆိုတာမွာ IP address မွာ 15.11.80.2 ၿပီးရင္ tab ခုန္လိုက္ပါ ..
subnetmark ကိုသူ႔ အတိုင္းရွိပါေစ..default gateway မွာလဲ...15.11.80.1 လို႔ရိုက္
ထည့္ပါ...အားလုံးကို ok လုပ္ၿပီးထြက္ပါ ...

ဒီလိုဘဲ တစ္လံုးၿပီး တစ္လံုး IP address မွာ 2 . 3 . 4 စသျဖင့္ ဆီးရီး ေပးသြားပါ..
အားလံုးၿပီးသြားၿပီ ဆိုရင္ေတာ့ ...စက္အားလံုး ရဲ႕ mycomputer > properties >
computer name မွာ အမည္ေတြေပးပါ...ေအာက္မွာရွိတဲ့ workgroup ဆိုတာမွာ ..
စက္အားလံုးကို Group name တစ္ခုထဲ တူညီစြာေပးထားပါ...

စက္အားလံုးကို ရီစတပ္ခ် လိုက္ပါ ...ဒါဆိုရင္ .. စက္အားလံုး ခ်ိတ္လို႔ၿပီးေနပါၿပီ...

တစ္လံုးက တစ္လံုးကို ေခၚခ်င္ရင္ .. run box မွာ ..\\ 15.11.80.2\ .enter ေခါက္
လိုက္ရင္ .. IP no 2 စက္ကို ေခၚလို႔ ရပါၿပီ...နဲနဲေလးေစာင့္ၿပီးမၾကာခင္မွာတက္လာ
မွာပါ။

Credit : http://battalion-byn.blogspot.com

Credit >> ဝင္းကမၻာ ေက်ာ္
 

Post By Admin Zuu

Continue reading →

Blogger ONE KOKO AUNG ကိုယ္တိုင္ေရးထားတဲ့ CPU Monitor Software

0
Saturday, September 21, 2013

ျမန္မာ ဘေလာ့ဂါ ဝမ္းကိုကိုေအာင္ ကိုယ္တိုင္ ေရးထားတဲ့

မိမိကြန္ျပဴတာရဲ႕ cpu ေမာ္ဒယ္ နဲ႔ အလုပ္လုပ္ႏႈန္း၊ အသံုးျပဳ႕ေနတဲ့ windows os ရဲ႕ version

ေတြကို ေကာင္းမြန္စြာ ေဖာ္ျပေပးတဲ့ ျမန္မာ ကိုယ္တိုင္ ေရးထားတဲ့ ေဆာ့ဝဲေလးပါ

အားေပးတဲ့ အေနနဲ႔ စမ္းသပ္ သံုးစြဲၾကည့္ဖို႔ တိုက္တြန္းေပးခ်င္ပါတယ္

ေဆာ့ဝဲေလးကေတာ့ ဖိုင္ေလးက ေသးေသးေလးပါ

 ေအာက္မွာေဒါင္းယူႏိူင္ပါတယ္


Credit to www.onekokoaung.blogspot.com


ကိုလတ္(ကြ်ဲဆင္း)


Continue reading →

အျခားကြန္ျပဴတာတလံုးကို လွမ္းထိမ္းခ်ဳပ္ႏိူင္တဲ့ SUPREMO 2.0.0.131

0
Friday, September 20, 2013


ဒီတခါ ျပန္လည္မွ်ေဝခ်င္တာေလး ကေတာ့ Teamviewer လိုမ်ဳိး မိမိ စက္ကေန အျခား

ကြန္ျပဴတာတစ္လံုး ကို လွမ္းၿပီးထိန္းခ်ဳပ္လို႔ရႏိူင္တဲ့ ေဆာ့ဝဲေလးပါ။ဖိုင္ေတြကို လင့္ခ်ေပးစရာမလိုပဲ

ဒီထဲမွာပဲ ရွယ္ေပးလို႔ရပါတယ္။ Teamviewer လိုမ်ဳိး Video ခ်က္ေတာ့ မရဘူး

ဖိုင္ဆိုဒ္ေသးေတာ့ လူတိုင္း အလြယ္တကူ ရယူ အသံုးျပဳ႕လို႔ရတာေပါ့

စမ္းသံုးၾကည့္မယ္ ဆိုရင္ ေအာက္မွာယူလိုက္ပါ


ကိုလတ္(ကြ်ဲဆင္း)

Continue reading →

Laptop နဲ ့ပတ္သက္ပီး သင္သိထားသင့္သမွ်

0
Thursday, September 12, 2013
Laptop နဲ ့ပတ္သက္ပီး သင္သိထားသင့္သမွ်
Image
သင္၏ Laptop တြင္ခ်ိဳ ့ယြင္းခ်က္ရွိခဲ့လ်ွင္ မိမိကိုယ္တိုင္ သိရွိႏိုင္ေစရန္ ရည္ရြယ္ပီးတင္ေပးျခင္းျဖစ္ပါသည္ ..
ယခု Zip File တြင္ပါေသာ PDFမ်ားသည္ Youth Computer မွ PDF မ်ားျဖစ္ႏိုင္ပါသည္ ...
ကၽြန္ေတာ္ကိုယ္တုိင္လည္း ဘယ္ဆိုဒ္က ေဒါင္းထားမိမွန္းမမွတ္မိေတာ့ပါ .... Youth Computer ကိုလည္း ဒီေနရာမွ Credit ေပးပါသည္ ။
Download Link >>> Dropbox
Author >>> Roo Kie
Continue reading →